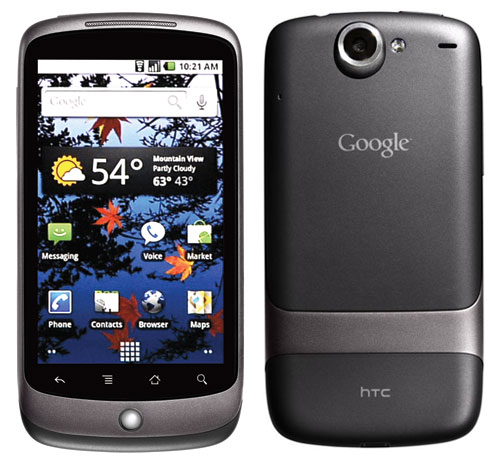
GUEST ARTICLE: After all the end of year hype Google confirmed that they had commissioned HTC to manufacture an Android smartphone which they had a fair amount of say in the specifications of at a press launch on January 5th 2010
This Nexus One handset is not “Google” hardware but Google influenced HTC hardware and essentially the successor to the first Google Phone (GPhone) the G1 (HTC Dream).

The big change in the way this phone is available for purchase and has been promoted has been the basis of many discussions. I think that Google may be well ahead of their time in online only sales and distribution but leading the way in this area has led to some difficulties because there’s no phone number for customers to call for technical support, just an online help forum/email.
Nexus One Hardware Specification
- Processor – The highlight of this handset has to be the Qualcomm Snapdragon QSD 8250 1Ghz Processor, providing the fastest platform for the Android operating system to date.
- Screen – A large 3.7inch WVGA AMOLED touch screen sporting an impressive resolution of 800×480 pixels.
- Camera – 5 Megapixel autofocus camera with LED flash which is able to capture video at 720×480 pixels.
- Storage – Internally carrying 512Mb ROM, 512Mb RAM and shipped with a 4Gb microSD card upgradeable to 32Gb for media storage.
- Battery– A claimed standby time of up to 250hrs or 5hrs of Internet use when on 3G coming from a removable 1400 mAH battery.
- Network support – Network frequency support for UMTS(900/2100) and GSM/EDGE(850/900/1800/1900). What this means for Australia is complete 3G support, no NextG network support for Telstra customers but you will get a Telstra 3G connection and then roam to GSM when it is not available.
- Other connectivity – Customary Wifi (802.11b/g), Bluetooth 2.1, AGPS, digital compass and accelerometer.
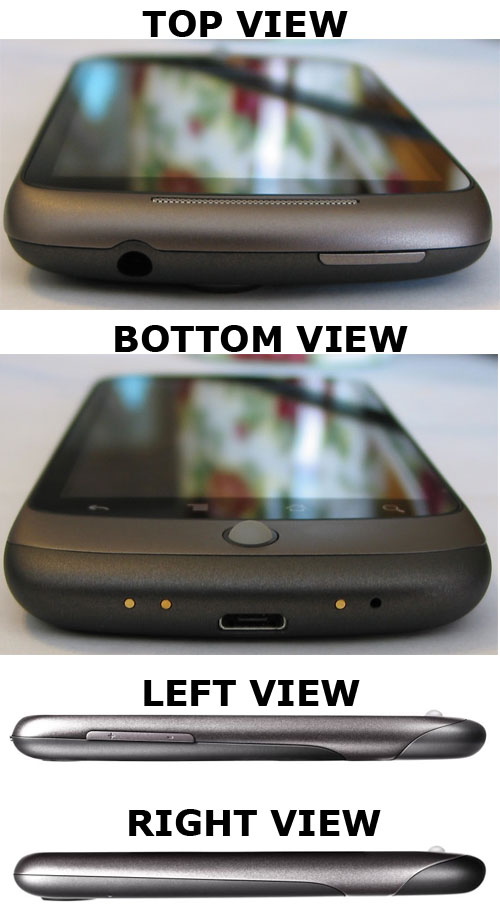
- Dimensions – All of this packed into a slim and stylish handset at 119×59.8mm and 11.5mm thick weighing in at 130grams which is marginally lighter than the iPhone 3GS at 135grams.

The 2 highlights of the phone have to be the screen and the CPU. The size and quality of image the AMOLED screen produces is of an amazing clarity and crispness that I have not seen before on a mobile phone.
There are other devices already on the market and being released soon with comparable resolutions including the HTC HD2, Sony Ericcson Xperia X10, ACER Liquid A1 and others, but this is the first I have had in hand and they are amazing! I am sure Apple will follow with something comparable very soon.
The second highlight is the Qualcomm SnapDragon 1Ghz CPU. This single component provides the speed which Android fans have been yearning for. It finally allows the operating system to reach its full potential in terms of performance and provides the best Android user experience to date.
{{3mobile-square}}
Camera
The Nexus sports a 5 Megapixel auto focus camera with LED flash. Android 2.1 has seen many improvements in the default camera software and coupled with the SnapDragon CPU the camera now consistently starts up in under 2 secs and has a much lower delay in snapping photos once you touch the onscreen “button” or click the scroll point.
The camera application has features that remind me of some features which HTC ROM’s for Android 1.5/1.6 have, including adjustments for image colour effects, white balance, geo-tagging and now flash settings.

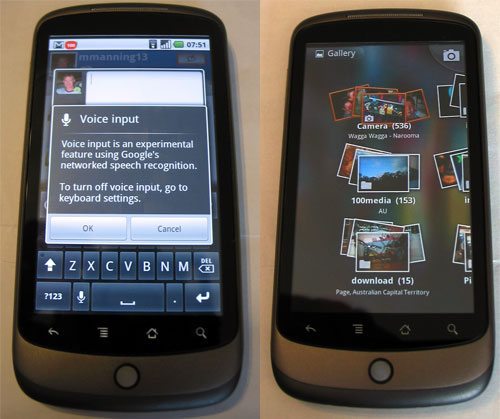
The picture gallery has a totally new 3D look and feel to the top level navigation. It divides your photos up according to SD card location (storage folder) and displays summary of geo-tagging information of the latest photos if available for each folder.
The 3D look of floating galleries and fly in image thumbnails adds a nice UI to what was a very bland Gallery navigation in previous Android releases. The gallery also provides thumbnails and access to any images you have stored in your Picasa web albums, although viewing and having access to these images is dependant on network access.
Battery
The 1400 mAH removable battery provides a full working day of moderate usage with ease. As with all high performance smart phones you will have to manage the battery usage accordingly. I managed to run through an 11 hour working day from full charge with moderate to heavy usage down to about 8% battery charge.
This included audio playback, Twitter, emails, Maps, Instant Messaging and taking photos. That is a marked improvement from the G1 which speaks volumes for Android 2.1 against older Android releases.
Google Integration
The default applications provide all that you could ask for in a modern smartphone. You get full Gmail integration for email, contacts and calendar and now with Android 2.1 you have the option of synchronisation with multiple Google email accounts. This is a real plus for me, we use Google Apps Premier for work and my home Gmail account now all available with the native Android Gmail app.
The contacts sync is smart enough to merge duplicates between accounts and yet provide you the ability to edit each as they relate to the original Gmail account. Contacts system wide are now more highly integrated and provide you access to contact details and various methods of communications anywhere you see a contact entry. You can call, email, SMS, IM, Facebook or just view the detailed contact information right from the contact photo where ever you see it.
As soon as you power on the Nexus you are prompted to sign into your Google account (or create a new one). The single sign on process is, in my opinion, yet to be matched by any other smartphone. With one single sign on process all emails, contacts and calendars are synchronised to your phone. This seamless approach to synchronising your existing information makes it an effortless process to set up and configure the core operating requirements you have from a mobile phone.
Android 2.1
Google Maps turn by turn navigation
One of the more publicized additions to the Android 2.1 operating system is the turn-by-turn voice navigation. The “Car Home” application can be launched from the applications menu or (I have read) will activate immediately once connected to the in car Nexus One mount piece (of which I have yet to see available anywhere). At the moment this feature is only available within the USA
Speech to Text
Another major addition across the entire Android platform is the “speech to text” input available in any text input field. You can select the voice input icon or swipe your finger across the keyboard to activate the voice input option.
Currently Google state that this is an experimental feature which uses the cloud to translate. In the “real world”, it works, as long as you speak slowly and don’t expect it to pick up colloquialisms or slang. You can also have some real fun laughing at what it comes up with 😉
General usage
After the first week I would have to say that 2.1 is nicer to the battery than either 1.5 or 1.6 have been. Even though it has to power the nice big screen I have been getting better battery life than with my G1. Whether 2.1 is faster is hard to say, all I can say is that with the 1Ghz processor the whole thing just fly’s by comparison. In general the Android 2.1 philosophy of operation is functionally the same as the 1.5 and 1.6 releases just with loads more polish, a few UI improvements and greater social integration.
Conclusion
After having a week of solid use with the Nexus One I am now convinced that this phone is going to be the benchmark to which all Android phones will be compared over the next 12 months.
It is fast, very fast when compared to any other existing Android device. I have had, at maximum, 24 applications running in the background at which point I noticed some lag in the phone.
Is it an iPhone killer? Well, no and it is not meant to be. In my view Google and Apple are taking a completely different approach to the smartphone arena. The iPhone is a phone, with a large media player backing, but is still based around the philosophy of being a phone.
The Nexus One (Android) is a small handheld computer which has the ability to make and receive phone calls. Now don’t take this as a harsh or generalistic appraisal of either phone or manufacturer, I am not taking sides or favouring one over of the other. The Nexus One is a great phone, as is the iPhone, they are just approaching the whole smartphone concept from a different angle.
Some would say that the Nexus One is aimed at the “geek” and requires a more “geeky” approach. I would say not, it is a very slim phone with a beautiful display and a simple UI. You can then build on it (install applications) as you need.
The iPhone is the same, a slim, elegant phone with a good display and extendable through the applications which you can install. The one large differentiator is the multi-tasking operating environment on the Nexus One which allows backgrounding of any application. I did hear a rumour today that iPhone 4.x will support multi-tasking, time will tell??
Getting “root” access to the Nexus One
The final chapter in this review is the process of getting “root” access to the Nexus One. What does this mean and what benefit does this provide? Root access to a Linux based device is the equivalent of “jailbreaking” your iPhone. You can then install and run applications needing access to system calls and functions which were previously protected by the operating system access controls.
Such applications include wifi tethering, control over the LED flash, multi-touch native browser support and ultimately the ability to install a completely new and reworked version of the Android operating system such as those for the HTC Dream (G1) previously released by Cyanogen.
Here is the “real” quick guide to how I gained root access to my Nexus One phone. This quick step guide assumes a fair amount of previous Android and unlocking knowledge and should not be followed without it. There are more detailed how to’s out there.
Step 1: Unlock the bootloader
First you must unlock the boot loader. Essentially allow the install of other boot loaders and “open up” the phone. You will need the Android SDK toolkit and I found I also had to download the “fastboot” client app from the HTC Developer center.
I did this from the Linux command line so did not need to install anything else except the SDK. Windows and Mac users will need to install some USB utilities. First check you can see the phone
./adb devices
Should return your phone listed with no errors. Now reboot into the “fastboot” mode by powering off and then holding the scroll point while pressing the power on button. You should boot to the screen with the 3 little androids on skateboards. Now back to the command line and check you can see the phone again, this time with the fastboot command.
./fastboot devices
This should list your phone again. Now unlock the bootloader with
./fastboot oem unlock
You will be presented with a screen asking you to confirm that you want to unlock and that this will void your warranty. Proceed at your own risk 😉 Your phone will OEM unlock and reboot.
Step 2: Flash with new recovery image
THIS STEP WILL WIPE ALL OF YOUR PHONE SETTINGS! YOU HAVE BEEN WARNED!!
You will need to boot back into “fastboot” mode again for this step. Once there you will need to flash this recovery image from the XDA forums. Using the command line again:
./fastboot flash recovery recovery-RA-nexus-v1.5.3.img
Now reboot again with
./adb reboot
You may need to re-enable the USB debugging mode at this point to continue with the next step. You can do this under Settings -> Applications -> Development -> USB debugging
Step 3: Flash with Cyanogens N1 addon package
This time you will need to issue the command which instructs the phone to boot to the above recovery image. Then flash the Cyanogen zip package. This package must be copied to the root of your phone’s SD card.
./adb reboot recovery
You will see a new screen with new options. You can use the scroll point to select the option to “Flash zip from SD card”. Next select the Cyanogen package which you will need to have in the root of your SD card – “nexus-addon-0.1-signed.zip”.
Once this is complete, reboot the phone and you are done!
I performed this operation on my phone and have had no adverse effects at all. Since “rooting” my Nexus One I have successfully installed many applications including Cyanogens Browser.apk which enables multi-touch in the default Android browser, various wifi tethering applications, CPU frequency scaling apps and the LED flash controls. I am looking forward to the first round of custom ROMs for the Nexus which are bound to make this little handset fly higher than it does natively!
How To Buy The Google Nexus One in Australia
You’re probably wondering how I’m using this phone and reviewing it from Canberra since Google is initially restricting sales of the Nexus One to people who live in 4 countries (US, UK, Hong Kong and Singapore).
There are several options open to Australians who want to buy the Google Nexus One right now.
- Relatives in USA, UK, HK or SG – I bought my Google Nexus One through relatives in the USA who posted it to me. This is the cheapest option if you can trust your relatives 🙂
- Buying Through A Freight Forwarder – who provides you with an address to say you live in USA, UK, HK or SG and then charges you a fee eg: $50 to post the phone to you.
- Buying from an Australian Importer – like Mobicity in Queensland (who charges $899 at time of writing). This option is the most reliable because you get an Australian 12 month warranty but expensive because Mobicity buys the phone from Google and adds a retail margin.
This guest technology review has been written by my friend Michael Manning (@mmanning13 on Twitter). Michael is an IT Infrastructure manager responsible for network infrastructure, server and desktop environment, hardware and support services, specialising in the Linux server environment.
If you’re a blogger or an expert about a topic I cover on this blog I encourage you to contact me and I’ll consider publishing your guest article here including generous attribution and back links back to your website as thanks for your contribution

Leave a Reply